Sharing and Distributing NPS Conversations
Once your NPS conversation is configured and saved, you need to get it in front of customers.
Oomiji offers two distribution paths: a public URL you can share anywhere (social media, your website, a direct link in a text message) and an embedded version you can include in an email campaign through Interaction. This article covers both paths, what recipients see in each case, and how to decide which path fits which situation.
If you have not yet configured an NPS conversation, see Building and Configuring an NPS Conversation first.
Choosing a Distribution Path
The two paths serve different audiences and produce slightly different respondent experiences:
- The public URL is an unauthenticated link anyone can open. Use it when you want broad, opt-in participation from any visitor who lands on your social post, website, or email signature. Respondents enter their email address as the first step of the survey.
- The email embed sends the NPS to a specific audience (your full database or a targeted segment) through an Interaction email template. Because the email is already addressed to a known contact, the email field is hidden and the respondent only sees the rating question and the Why follow-up. Responses are automatically tied back to that contact's record.
In practice, most businesses use both: the email embed for structured measurement campaigns (quarterly NPS sends to active customers) and the public URL for passive, always-on collection (a link in your site footer or post-purchase receipt).
Sharing the Public NPS URL
Every saved NPS conversation has a public URL you can share directly. To access it:
- Click Satisfaction in your toolbar.
- In the top right of the Satisfaction Metrics card, click the three-dot overflow menu.
-
Select View to open a preview of your live NPS conversation. The URL in your browser's address bar is the public link you can share.
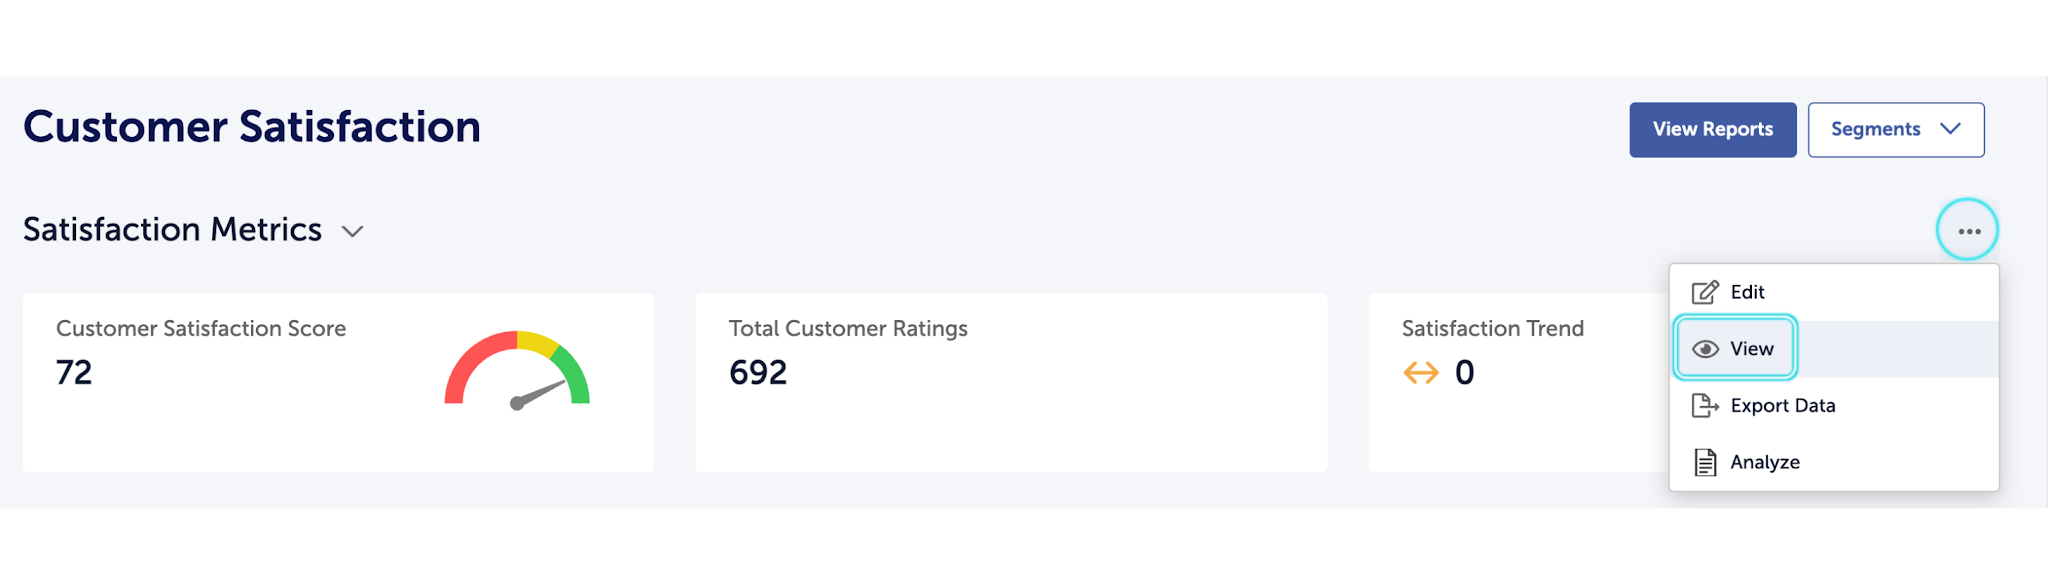

The URL is also visible at the top of the NPS configuration screen. To see it there, open the overflow menu on the Satisfaction Metrics card and select Edit; the link appears beneath the Reconfigure NPS heading and can be copied from either location.

What the URL looks like
The public URL follows the format oomijiapp.com/measure/nps/ followed by a unique identifier derived from your NPS title. For example, an NPS titled “How are we doing?” generates a URL like https://oomijiapp.com/measure/nps/how-are-we-doing.
The identifier is locked once the NPS is first saved and does not change if you later edit the title.
Where to use the URL
The URL works anywhere you can post a link:
- Social media posts (LinkedIn, Facebook, Instagram bio, X)
- Your website (footer, dedicated feedback page, customer portal)
- Post-purchase receipts, order confirmations, and transactional emails
- Email signatures for customer-facing team members
- QR codes on physical collateral (receipts, packaging, in-store signage)
Because the URL is unauthenticated, it is a good fit for always-on collection from any source, not just your current contact list. Responses from the public URL still feed the same Satisfaction dashboard and the same AI analysis as responses from the email embed.
What the respondent sees
When someone opens the public URL, they see the full NPS conversation as you designed it: your logo, your title and description, the email field, the 0-to-10 rating question, and the Why follow-up. Email is required, which is how Oomiji ties the response to a contact record.
Embedding the NPS in an Email
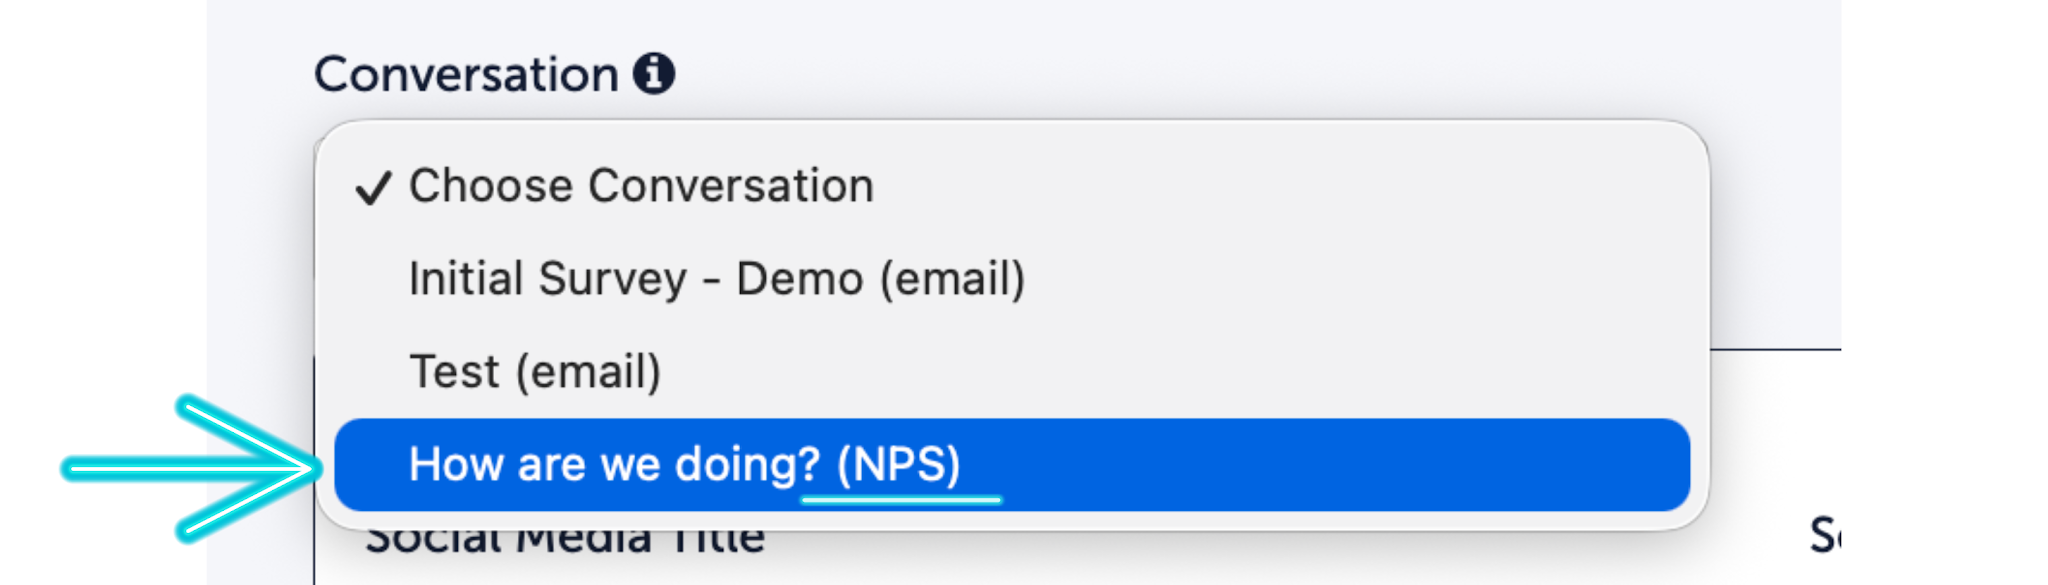
The email embed path lives in the Interaction section, where you build and send email templates. Any saved NPS conversation is available to attach to a new email template, where it appears with an “(NPS)” designation in the Choose Conversation dropdown to distinguish it from standard Insights conversations.
To embed your NPS in an email:
- Click Interaction in your toolbar.
- In the Email Design Center card, click Create New Email.
- In the template settings at the top of the screen, open the Choose Conversation dropdown.
-
Select the NPS conversation you want to attach. It will be listed alongside your other conversations with an “(NPS)” designation after the title.

From there, build the rest of your email as you would any other template: compose the message, add content blocks, set your subject line, and save. For the full email template workflow including the drag-and-drop editor, see Building and Designing Email Templates.
What the recipient sees
When you send an email with an embedded NPS conversation, the recipient clicks the embedded link and is taken to a customized version of the NPS where the email field is hidden. Because Oomiji already knows who the recipient is, they only see the 0-to-10 rating question and the Why follow-up. Their email is passed through the URL automatically, and their response is attached to their contact record in the Database.
This is the structural difference between the two paths: the public URL asks the respondent for their email; the email embed already has it.
The NPS email works through the same Interaction infrastructure as any other email campaign. That means your Mailing Suite Profile sender settings apply, your suppression list is enforced, and you can send to any mailing list or segment. You can also schedule the send, resend it to non-openers, and measure its performance like any other campaign. For scheduling and performance details, see Sending and Scheduling Email Campaigns and Measuring Email Performance.
Copying the NPS Link from the Email Builder
Inside the email template builder, a Copy Conversation/NPS Link button appears next to the Choose Conversation dropdown once you have selected an NPS. Clicking it copies the conversation's public URL to your clipboard, which is useful when you want to reference the same link elsewhere (a social post, a website page, a secondary channel) while also using it in the email. This is a convenience shortcut; the link you copy is the same public URL available from the Satisfaction dashboard overflow menu.

What's Next
Once your NPS is in the field and responses are coming in, the dashboard and segmentation workflows take over:
- Navigating the Satisfaction Dashboard explains each widget on the dashboard and how to read the AI output from your incoming responses.
- Segmenting and Acting on NPS Responses shows how to build segments from NPS data and use them to drive follow-up outreach through Interaction.
- Building and Configuring an NPS Conversation walks through editing the questions or settings if you need to adjust your NPS before expanding distribution.